Transforming Items
This tutorial explains how to move, scale and rotate items in your Paper.js project.
Please note:
To be able to show the difference before and after transforming items in the following examples, we create a copy of the original item which we then transform. We use item.clone() to create a copy of an item. The original items have a black stroke and the copies have a red stroke.
Changing the Position of an Item
You can move an item around in the project by changing its item.position property. This moves the item by its center point.
For example let's make a path and then move it to another position:
Let's quickly go through the code above. In the first line we create a circle shaped path with its center point at {x: 50, y: 50} with a radius of 25 pt. In the second line we change the position (the center point) of the circle shaped path to {x: 100, y: 100}
We can also move an item by a certain amount using the += operator.
The following example creates the same path as above, but instead of moving it to an absolute position, moves it 10pt to the right and 20pt down.
var circlePath = new Path.Circle(new Point(50, 50), 25);
circlePath.fillColor = 'black'
circlePath.position += new Point(10, 20);
To make an item follow the mouse, we can simply set its position to the position of the mouse. Move your mouse over the view below, to see how the item follows your mouse.
The Bounding Rectangle of an Item
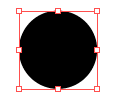
When you select an item in a vector graphics application like Illustrator and select the transform tool it draws a rectangle around the item which describes its boundaries:

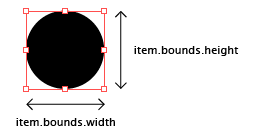
In Paper.js we can find out the dimensions of this bounding rectangle by looking at the item.bounds property of item.
Please note:
The item.bounds property is a Rectangle. Rectangles are described in detail in the Point, Size and Rectangle tutorial.
For example if want to know the width and height of an item, we can query the item.bounds property for width and height:
var circlePath = new Path.Circle(new Point(50, 50), 25);
console.log(circlePath.bounds.width); // 50
console.log(circlePath.bounds.height); // 50

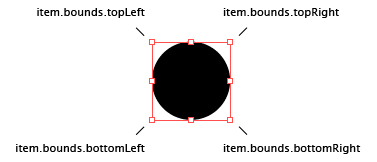
We can also find the position of the corner points of the bounding rectangle:
var circlePath = new Path.Circle(new Point(50, 50), 25);
console.log(circlePath.bounds.topLeft); // { x: 25.0, y: 25.0 }
console.log(circlePath.bounds.topRight); // { x: 75.0, y: 25.0 }
console.log(circlePath.bounds.bottomRight); // { x: 75.0, y: 75.0 }
console.log(circlePath.bounds.bottomLeft); // { x: 25.0, y: 75.0 }

Scaling Items
To scale both the width and height of an item by the same amount, you can call the item.scale(scale) of the item.
Let's make a path and then scale it by 50%:
Scaling an Item Around a Center Point
By default the item.scale(scale) function scales an item around its center point. If you want to scale around a specific position, you can pass the scale function an optional center point: item.scale(scale, point).
Let's make a path and then scale it by 50% from {x: 0, y: 0}:
Since the corner positions of the item.bounds bounding rectangle are also points, we can also pass them to the item.scale(scale, point) function to act as a center point for the scale transformation.
For example, if we would want to scale an item by 50% using the top right position of the bounding rectangle:
Items can also be scaled with different horizontal and vertical scales. To do this we pass two numbers to scale using item.scale(sx, sy).
For example, we can create a path and scale it horizontally by 500% and vertically by 150%:
Rotating Items
To rotate an item we call the item.rotate(angle) function and pass it the angle we want to rotate by in degrees. This will rotate the item by the angle in a clockwise direction.
Now, let's create a rectangle shaped path and rotate it by 45 degrees:
To rotate in a counter-clockwise direction we pass a negative angle to the item.rotate(angle) function:
We can repeatedly rotate the path in an onFrame handler to make an animation:
Rotating Around a Point
In the same way as you can pass a point to the scale function to scale around, you can also pass a point to the rotate function to rotate around.
For example, let's rotate around the bottom left point of the bounding rectangle:
Advanced Example
Lets write a more advanced script that clones an item multiple times in a loop and rotates the clones by different angles.
Please note:
Cloning (copying) items is described at the end of the Working with Items tutorial.
Let's go through this script line by line.
First we create the path that we will be cloning and we make a variable called clones where we store the amount of clones that we want:
var circlePath = new Path.Circle(new Point(150, 150), 25);
circlePath.strokeColor = 'black';
circlePath.fillColor = 'white';
var clones = 30;
In the third line, we make a variable called angle and pass it 360 degrees (a full rotation) divided by the amount of clones we will be making:
var angle = 360 / clones;
Next, we loop the amount of times we defined in the clones variable:
for (var i = 0; i < clones; i++) {
Basically what this line does is make a variable called i and start it with 0. Then it executes the block of code that is in between the { } brackets. After executing, it adds 1 to i and compares i to the clones variable. If i is still smaller then the clones variable, it executes the code block again.
Within the loop we clone the path using item.clone() and rotate it by angle * i from the top left point of its bounding rectangle. This means that when i is 0, the cloned path is rotated by 0 * angle and when i is 5 it rotates the cloned path by 5 * angle:
	var clonedPath = circlePath.clone();
	clonedPath.rotate(angle * i, circlePath.bounds.topLeft);